Showing posts with label quilting. Show all posts

Thursday, March 14, 2013

Easter Wall Hanging Quilt Top


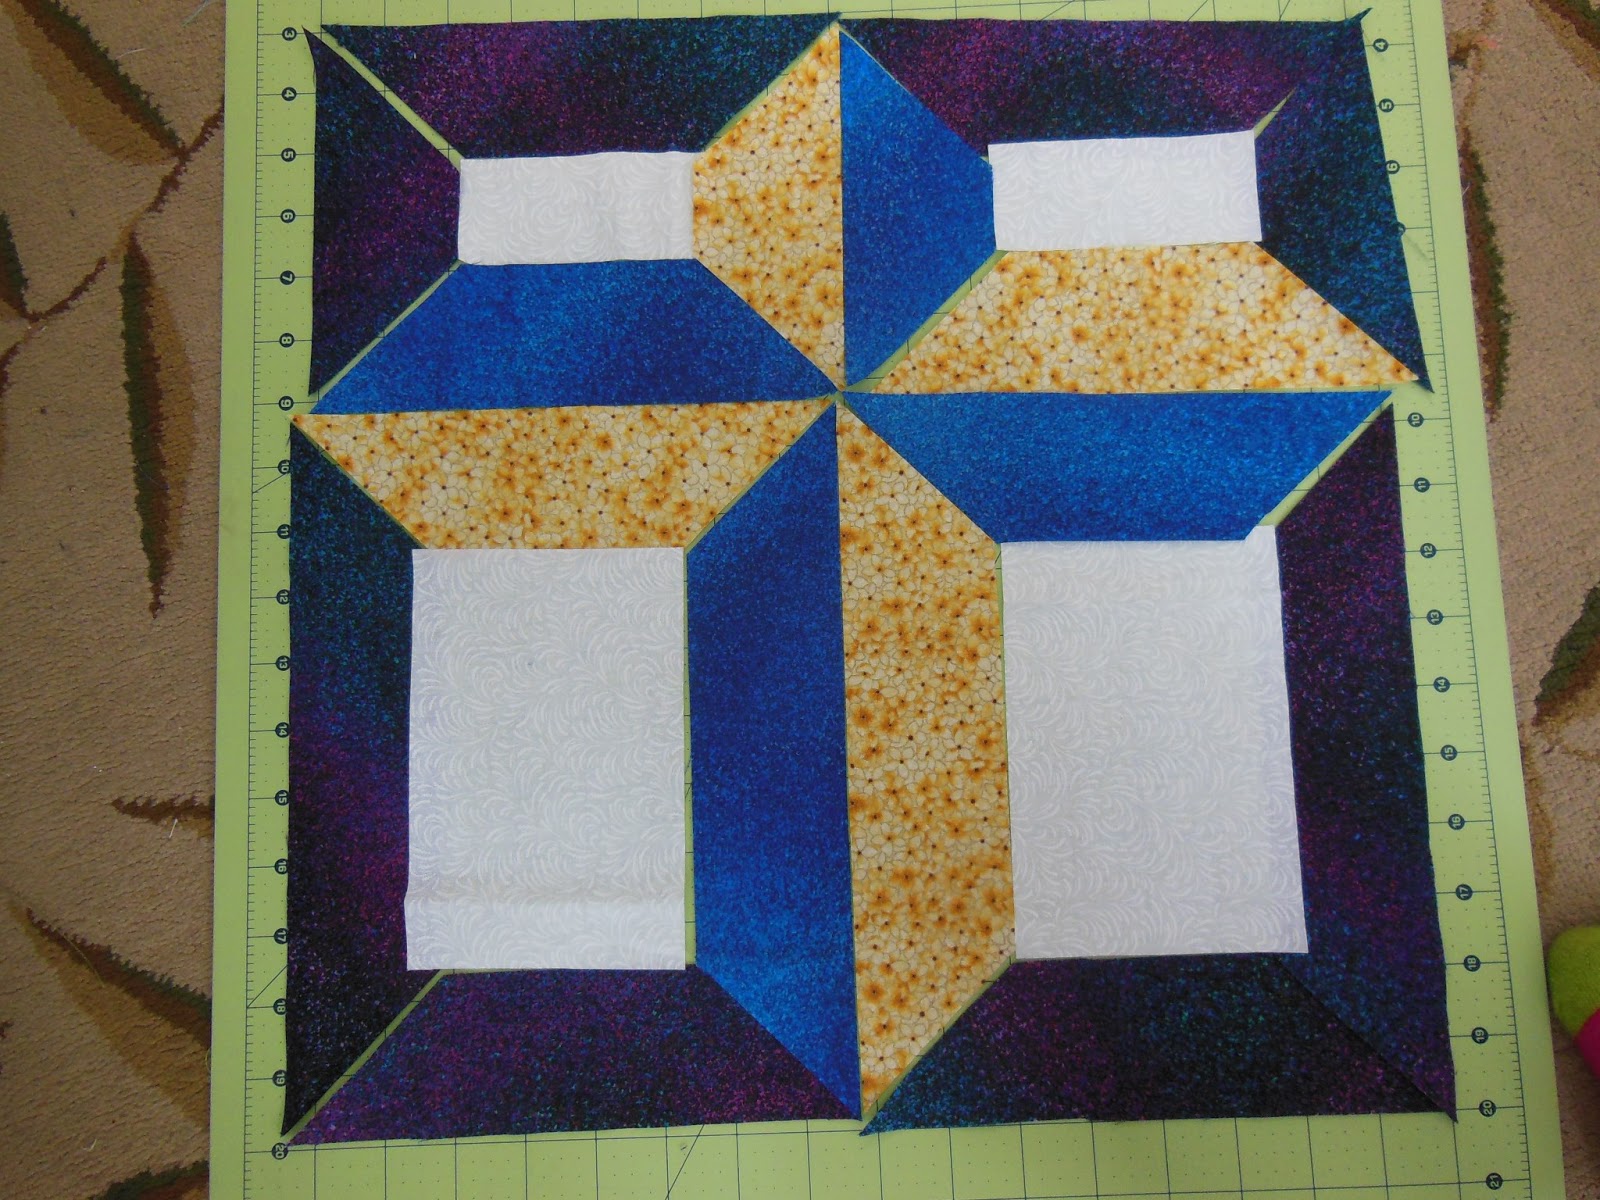
So far I have been able to make a wall hanging quilt for every holiday since Valentine's, actually Christmas if you include the magic quilt.   For Easter I decided to incorporate a cross into the quilt to remember that Easter is not just Easter eggs and bunnies.  Sure enough, when my 4 year old saw my fabric choices, she did asked me why.

As you can see, the fabric choice was mine.  It looked ok to me when I was at the local JoAnn's.  But obviously, I still needed a lot of learning and practicing for picking the right fabric combinations.  But since I have the easter bunny, easter egg, easter lily and the cross all together and I wanted to start the project already, I still continued with the plan.

While going through online and some magazines for a quilt pattern to follow, I finally decided on the book "Quilted Devotions".  Because the sizes for the finished blocks is just perfect for the wall I have been using for my quilts.  Lisa Cogar called this pattern "Jacob's Ladder".

The intimidation/apprehension I always felt when I started a quilting project is slowly diminishing.   Even when I know my fabric choices were not great.  It was still a good satisfying feeling finishing the quilt top.

 
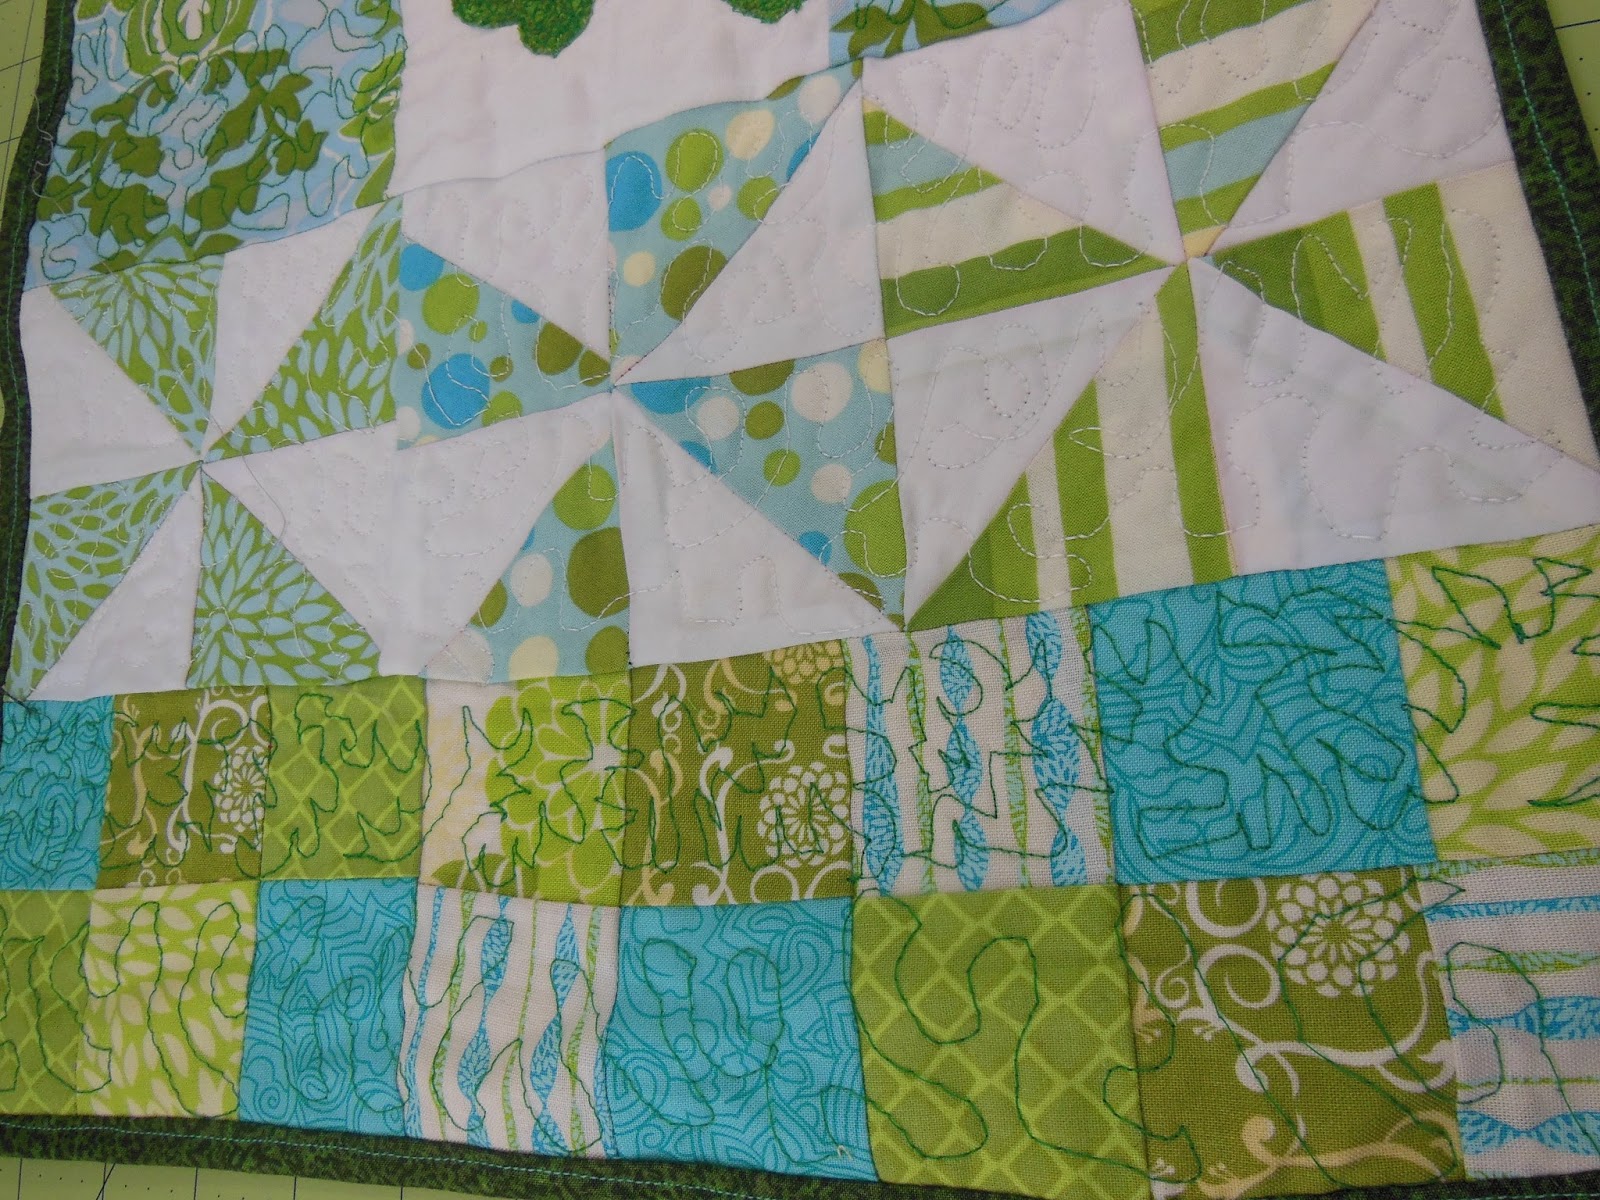
I am sure you would have noticed by now that I don't like to have lots of leftover fabrics.   Most of the time I used the same fabrics to the back.  This is the backing for the quilt.

Will post the finished project again when I am done with the quilting.  Thank you for visiting.

Wednesday, March 6, 2013

Cross Wall Hanging Quilt


The hubby suggested a cross wall hanging for my next project.  But I was not able to find any free tutorials for the cross quilts I found online.  Thanks to a local fabric/quilt shop "Material Mart Quilt Shop," I was able to buy a copy of the book "Quilted Devotions".  This is the third quilt block in the book and is titled "The Cross".

Quilted Devotions is a very interesting quilting book which includes 24 block sampler quilt.  The author Lisa Cogar included a quote from the bible for each of the block section.  Each section also contain very detailed instructions and patterns on how to cut and piece together all the fabrics.  A completed block can be put together with the other blocks to give us a big quilt or in my case this is a 14 X 14  inches quilt we are going to use as a wall hanging.

Since this is a requested quilt and will likely be on our wall the whole year, I did not play with my free motion quilting design for it.  I decided to just go traditional and line quilted throughout the whole quilt.   Understandably, from what I have produced so far with my previous quilts, the hubby and the kids all liked the lines better than my other quilting designs.


This picture was taken after I finished all the fabric cutting and put all the small pieces together to see how it would look.  I was satisfied with the fabric choices and again a big thank you to the person who helped me at the shop.


This is the back.  Again, I went traditional and used the same fabric I used for the cross, to the back of the quilt.  It was big enough that I decided not to do any more cutting and sewing for it.

This was a six hour project from cutting to the end.  Since I only have limited fabrics and wanted to finish the project the same day, I spent a few seconds more to do each cut and each sewing just to check and double check that I will not make any mistake.  Of course every cut also includes a few minutes of answering the why, how and what questions I get from my 4 year old, who also likes to arrange the pieces her own way.   The "WOW" I heard when I finally get the chance to finish my arrangement was worth all the minutes trying to be patient to both the fabric and Lyn.


Monday, March 4, 2013

Saint Patrick's Wall Hanging Quilt = Done


This is the final product.  Approximately 20 X 14 inches in size.  So far the biggest one for me.

The two pictures below shows the quilting designs I tried.  The blocks with lots of white fabric, I used white thread and used stippling design since it is the design I am most comfortable with.  But still needs more practice.

The smaller blocks, I quilt with random designs which shows hesitant lines and curves whenever I am not sure which direction to go next.  Of course, I used the green thread to show the quilting designs I am playing with more clearly.  Just so I can see how my free motion quilting design started.


This is the back.  I used white bobbin thread for all the quilting in this project.  The tension at the back also need to get better, some part gets a little too loose and sometimes too tight.
 
Here is another picture.


Monday, February 25, 2013

Saint Patrick's Quilt Top and Back


This is the top of the Saint Patrick wall hanging quilt.  The green fabric behind is just the backing.

The blocks I finished yesterday did not give a balanced look.  So I decided to make a few more of the scrappy 4 patch and pinwheels and attempted to make an applique of a clover leaf.  All the lines did not match up as straight as it should.  But I am hoping that the quilting will cover it up.  Hopefully, I will do a better job this time and not ruin the final product.  Something we still have to look forward to.  We will see.


This is the backing with the four leftover scrappy 4 patch blocks I ended up having.  I pieced them together in the middle of some green fabrics.  


 As you have known from my previous post, what I did yesterday was not planned but a random piecing of green fabrics inspired by the tutorial I saw.  Therefore, the number of blocks were not able to give anything visually acceptable.   Since a Saint Patrick quilt just shouts "clover leaf" , I decided to add a block with an applique of the lucky leaf.  To balance it off, I added 2 square charms  to the sides as well.

Quilting to follow.  Hopefully,  I will do a satisfactory job.  Enough to make this a better quilt hanging than my Valentine's wall hanging quilt.

Sunday, February 24, 2013

Scrappy 4 Patch and Pinwheels


This quilt top is not finished.  The kids and I can't decide how we are going to arrange the final product.  Although the color palette was inspired by the fact that St. Patrick's Day is coming.  There  really was no thought or planning as to what designs to do.  Plus the fact that the 4 patch block is smaller than the pinwheel block is not helping.

The fabric is a set of 20 charm pack I bought from Meijer.  It was the only green charm pack I could find in that store at that time.  The white is the same muslin fabric I bought before and I cut it to a charm size which is 5 x 5 inch.


The pinwheels still needs a lot of practice for making the points meet more sharply.  While the 4 patch looked ok, I did something that made them smaller than they should.

Here is another arrangement we have played with:

 
I got the tutorial for both pinwheel and 4 patch from Jenny Doan of Missouri Quilt Company.  Here are the youtube links:


Thank you for stopping by.  Final product will follow.


Wednesday, February 13, 2013

Valentine's Day Quilt Wall Hanging

 
So I decided to make another Valentine's Day quilt.  This time it is 8.5 X 9 inches in size and I attached two little hoops on the top for hanging.  I used the leftover fabric from my previous heart quilt/applique, added a white muslin fabric and a red fabric I got from JoAnn's.
 
The source for my heart piecing for the top is one of my favorite youtube tutorial.  She makes things look like they are a breeze to make.  She is Jenny Doan from Missouri Quilt Co.


The stippling quilt design is now a little bit better than my previous ones.  Another favorite youtube tutorial is Leah Day.  If you browse around Leah Day's blog, you will see a ton of quilting design tutorials.  I have watched a lot of other videos but always come back to these two whenever  I really want to try something.  As you can see in my first picture, I tried to draw hearts on the right side and attempted at a technique called paisley on the left side.  I successfully made a mess on both.

 
I used up the cut off triangles from the heart and added some of the pink fabric for the back of the quilt.  Giving us just a random look that is good enough for backing. 
Until the next one...


Monday, February 11, 2013

Quilt for Valentine's Day


This quilt is just about 4 x 6 inches in size.  I had originally planned to pieced together a wall art for Valentine's but an unexpected snow day made me changed my plan.  As you can see I decided to applique the red heart shaped fabric onto the pink fabric.  
 
 
This is how the quilt top looked like after the applique of the hearts.  I used zigzag stitch for both the applique and the borders.

When I told Vyn I am going to try to quilt some designs into the whole fabric.  He said: Don't mama you might fail again.  This is pretty already.

Me:  This is something you have to fail a lot of times to succeed.

 
This is the back of the quilt.  I am quite proud of the fact that there are no more loose threads at the back.  All that was needed is to pull the bobbin thread all the way to the top before you start quilting.  I tried to free motion quilt some hearts into the quilt on the top left side.  Obviously needed to work on that some more.  Did a few lines diagonally in the middle using the walking foot.  Also did another free motion for the lower right with a technique they call stippling.  Definitely needed more practice to even out the sizes and distances between lines and designs.


Let's just say, I am still having fun learning from all the youtube tutorials.  Will be back with another  project.

Saturday, February 9, 2013

Table Runner Quilt


This table runner came as a quilt kit from Annie's Catalogue.  I was able to learn how to cut and piece together triangles.  Was so glad when all the pieces lined up.  Then of course I have to try free motion quilting.  As you can see in the pictures below, if I had just moved on to the next project and be done with it, the table runner would have been a success already.


This is the result of an amateurish free motion quilting.  Instead of enhancing the beauty of the fabric, I added some doodling that would make my 4 year old's art look so much better.

Does not mean I am giving up on quilting though.  This is just my second piece.  Maybe I should just go back to scrap fabrics again and practice some more.

This is the back.  I pieced another fabric to the original to give the whole table runner a second look.  The bobbin thread was beige so the quilting is a little hidden.

Learning how to quilt project is still on and I will post more as I finished each and every piece.  Let's all see if I can make myself learn and maybe be good at some useful craft.   

Monday, January 21, 2013

My Very First Quilt


Today is the day I finally took the courage to really try quilting.  These fabrics are not ironed out or cut precisely for anything.  I got them from our leftover fabric stash from the No Sew Quilt Christmas Ornament we made last month.  Just trying out what quilting is like.

The whole quilt measured 9 X 14 inches.  I watched a lot of youtube videos on how to do this and so far I think I got the connecting of small fabrics for the quilt top correctly.  However, it took me a few tries to put the binding fabric together.   I definitely still have a lot of other techniques to learn.  This is the most basic way of doing it.   I also need to learn how to position seams for a smoother result.   As you can see the quilting was not smooth but the videos all mentioned that it will slowly come as we practice more.  Something to look forward to and to keep me busy for sure.


These two pictures are the back and if anybody could tell me how to prevent the top thread from becoming loose in the back, that would be greatly appreciated.  It was all smooth in the beginning then it started loosening in the middle but was gone and was tight again for the zig zag pattern.

 
I can't wait for all these lines and quilting to show some smoothening and tightening.  Then I can play with colors, fabrics and designs.  I would love to see if I have any creative juices running in my veins.  If I don't have the juice, then it will still be fun playing with colors, fabrics and quilting designs.


Thursday, January 17, 2013

Quilt Magic


While searching online for some beginner quilting project.  I found a lot of kits that included the fabrics and no sewing needed.    Of course I had to try it.  This project is called "Quilt Magic" and I bought this from amazon.com. 

Obviously, as you can see in the picture above, I made a mistake and had to patched the right upper hand corner with another fabric.  I cut the fabric on the wrong side and had to scrap that piece.  The project is easy for anybody and especially somebody like me, who don't have much experience with sewing.  All we need is scissors to cut the fabric and then tuck it in slits that are already cut in the foam also provided.  But a mistake in cutting can mean we have to substitute or go search for same fabric.

It was a fun and easy project and my 4 year old also helped tucking the fabrics in and cutting the pattern.  Maybe we could try it again with an easier picture.  We will see and will surely post any new projects we do.

Friday, December 7, 2012

Quilted Christmas Ornament (No Sew)


This week started out as a sick Monday and Tuesday for us so we decided to do a home made Christmas ornament to add to our collection.  This is what we decided for this year.  We found it at youtube.

This is how our project turns out.
 
As you can see, my 4 year old did the cutting of the fabric.  Those curves are very easily hidden.  No need to be a perfectionist for this project.  But after a few balls, the thumbs starts hurting from pushing all those pins.  Again,, easily remedied by not following the steps completely.  Instead of 3 layers of fabric in each side of the ball, I did only 2 layers on some of the balls.
 
 
We like seeing them all together.  Sick days can be productive as well. 
 
Have a Merry Christmas everyone!